Friday, December 5, 2008

Recycled Ornament IV


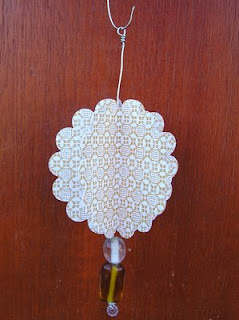
Another envelope craft! This was red & white. I thought it was perfect for Christmas! I did every other scalloped circle red and added the ribbon. See two posts below for the other sample!

Quilled Invitation


Here's a wedding invitation I framed with my quilling for the gift at shower we're going to tonight! I hope they like it! The invitation was printed in the exact color of Elegant Eggplant, so I mounted the invitation on the cardstock, quilled flowers and vine and added them. I had a hard time finding the right frame, I didn't really want black. It is an 8x12. Not many of those around, but it grew on me.

Tuesday, November 25, 2008

Recycled Envelope Ornament III


Another ornament from recycled envelopes. I am really enjoying these! 10 punches from the scalloped circle punch, folded into triangles, glued the edges together. There are lots of samples of these out there, but mine are almost FREE!

Saturday, November 22, 2008

Angel Ornament


My mom sent me this idea. Fun, and didn't require much time or any stamping. It was meant to be a tag, but I made it an ornament instead. The dress is just a section of the scalloped circle punch. The wings are vellum and the head a simple, 1/2 inch, circle punch.

Tags

I was in the mood today, inspired by the upcoming Christmas holiday, conversations with friends, and a few paper magazines. These are the ones I created....

I need to get a "to/from" stamp or two from the store this week!

Thursday, November 20, 2008

Recycled Envelope Ornament II


My second ornament made from recycled envelopes. I have kept these envelopes aside because I love the rich mustard color of the pattern, and thought they would be a great ornament. I punched 5 scalloped circles from the envelope, folded them in half and glued them together. Before gluing the last one on, I put the wire on the inside of the middle. Then added the beads to the bottom of the wire and made a little loop on the top. Easy, simple ornament...made almost for free!

Monday, November 17, 2008

Recycled Envelope Ornaments

I saw an ornament in a magazine that gave me this idea....


I cut strips of an envelope in about 1/2 inch by 4 1/2 inch lengths, then folded them in half twice to get crisp creases. Then I unfolded them only once and glued the bottom half of each side to the next strip. Then glued the strips all together in the center with a 1/2 inch circle on the front. You can see (I hope!) that the difference between the two is the pattern in on the inside of one and on the outside of the other.

What do you think? Cool, or cheesy?

Friday, October 31, 2008

New Stamps


I got some new stamps off Ebay. I look on there all the time, but very rarely actually bid on anything. I am SO happy with this purchase. I got a set of 239 stamps for $32. I think that is a pretty good deal!
All the stamps used in this card are from the new stash. I love the monochromatic look and the placements on here. Used the ink to match the Eggplant cardstock on all stamping. Then used a paler color for framing the two stamped pieces. Added a Vanilla sheer ribbon and was done.

Tuesday, October 21, 2008

Collar


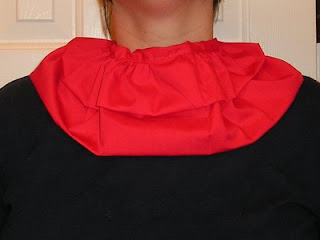
I know what you're thinking....."That's not exactly trendy!" What you may not know is that it is a prop for my clowning costume. I decided to really make my clown costume better for wearing this Halloween and am hoping to do some clowning around town after Halloween. I was thinking of visiting a children's home, nursing home, etc.


I took a piece of red fabric and doubled it over then doubled it over again, a little longer to make a two-tiered gathered piece. Then I sewed it and gathered it and sewed again at the right length. then took piece and sewed it over the collar to make it finished on the top. I'm not a great seamstress, but think this will add a big punch to the clown costume! Now if I could just find a shirt I like to go under it!!

Thursday, October 9, 2008

Ornament Trio Card

I got the inspiration for this card here. http://www.splitcoaststampers.com/gallery/photo/1078313?cat=all&what=keywords&si=CCC08


It's supposed to be three ornaments. Sometimes they just do not look as good in real life as they do in my head! I stamped the three ornaments on ivory paper in burgundy ink. Then I colored them in with pencils. I punched out the three circles wiith the only size circle punch I had (I think it looks much better in the example with different sizes). I stamped on the burgundy bow and used a ruler and marker for the hangers. Then stamped the grey cardstock with the linen background and Versa Mark Ink and a sentiment. I put the ornaments in place and then glued down the grey piece to a burgundy card. Ta da!

Tuesday, October 7, 2008

Sweet Little Card


I was inspired by a cute little card my sister gave me, made with the same set-up but different stamps/colors than this. I wanted to do a baby card with this plaid paper and this is what I came up with. I stamped the baby 3 times, colored her in different colors from the plaid background. I used a deckle edge for the patterned paper and the pink cardstock. I stamped the sentiment on the green that matched, framed it in white, and added the button. The button really makes the card in this case. I was really not liking it at all until I put the button on.

Wednesday, September 17, 2008

New Stamps

My Mom brought these stamps to my 3 year old daughter. I told her I'd have a hard time leaving them in her craft closet and not using them myself. I had the girlfriends over last night and created a couple cards with them.


Both were fairly simple. I stamped the fashion themed one with brown ink and used chalks and a blender pen to color them in. Then stamped the sentiments in brown onto the red cardstock. I like it, but think it's super simple. The ladies said it looked finished, but I feel like it needs more....
On the cat one, I stamped stars in the background with red, then the cat was stamped in brown as well and colored with aqua chalk. Working with the gals inspires me to put together fun color combos. Stamped the same sentiment with brown onto red. Fun!

Monday, August 18, 2008

New Cards


I worked on some cards this week. I am not going to explain them all....they're not difficult to do. If you have any specific questions about technique/stamp set, let me know. I had a set of stamps that I'd hardly ever used with these small sayings on them. I was trying different ways to incorporate them into my cards. The set is Cute Converse. It's on the last three of the cards.

Tuesday, August 5, 2008

Quilled Invitation


Here's my friend Tiffany's wedding gift! I've not mailed it yet....so I hope she doesn't check this site! I did some quilling on her invitation, matching the blue on the invitation and adding a creamy base color for the swirls and framed it! I hope she likes it!
I've never done that bow on top before, and it posed a little challenge, but I like it and think I'll do it again!

Tuesday, June 24, 2008

New Gaucho Pants


I saw the idea and instructions on craftster.org (http://www.craftster.org/forum/index.php?topic=99090.0) for these gaucho pants made from tee shirts. The instructions were easy, because all you do is cut the shirt sleeves off and cut it down the middle. Then you re-arrange the pieces, sew up the sleeve areas to be the crotch and sew down the sides for the legs. They were too low riding for me, so I took a second tee and made the waistband, sewing a button hole in before closing it up and then inserted a drawstring. Tee-shirts are very stretchy and my hips/bottom wouldn't hold the pants up! Man, are they comfortable! I plan to make more of these! And you can buy/use shirts in any color to make them different....to match bathing suits, shirts, anything! How fun!